PJ on Development
Thoughts and babbling about software development. Visual Basic, .NET platform, web, etc.
| Title: | Snowflakes in a Flash |
| Description: | How to easily create falling snow flakes with Macromedia Flash. |
| Author: | Paulo Santos |
| eMail: | pjondevelopment@gmail.com |
| Environment: | Macromedia Flash |
| Keywords: | Flash, Multimedia, Snowflakes |
Snowflakes in a Flash
DISCLAIMERThe Software is provided "AS IS", without warranty of any kind, express or implied, including but not limited to the warranties of merchantability, fitness for a particular purpose and non-infringement. in no event shall the authors or copyright holders be liable for any claim, damages or other liability, whether in an action of contract, tort or otherwise, arising from, out of or in connection with the software or the use or other dealings in the software. |
||
Introduction
For the last three years my wife and I have been sending electronic Xmas cards. No, not that annoying musical ones. I mean the kind that we send through e-mail.
It's pretty, it's easy, and we save a lot on stamps!
In the first year we did this we just sent a picture that we had made by ourselves. Last year we made a small slide show in Flash because I was experimenting a little bit with the Flash MX.
This year we decided to do it again. But I don't like to repeat myself much (you know, people might still have the old one), besides I just put my hands on my new Flash 8 .
My wife decided to use as a background a winter scenery and this gave me the idea of falling snowflakes through the entire presentation.
What you will need
To make the falling snowflakes you'll need the following items:
- Flash 8 or Flash MX
- Snowflakes images
My wife is a fan of Monk and because of this I used EXACTLY TEN (an even round number) snowflakes images, as displayed below.
 |  |  |  |  |
 |  |  |  |  |
You can copy each image, or you can download all of them here.
Preparing the Animation
- Start the Flash and create a new movie.
- (optional) Configure the background to black. It will be easier to see the snowflakes.
- Select
File/Import/Import to Library...add all the images to the library.
- Now we need to transform each image in a Symbol. The easiest way I know to do this is to drag each image to the stage, right click it and select
Convert to Symbol...
- Select
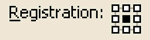
Movie clipfor the type, checkmarkExport for Action Script, andExport in First Frame. Make sure that the Registration Mark is in the center, as shown in the picture. Type name likeSnowFlake1_mcas theIdentifier.
- Repeat the steps for each image. Make sure that all the images have consecutive identifiers:
SnowFlake2_mc,SnowFlake3_mc, etc. Avoid the temptation to place a leading zero before the number.
- Select Window/Actions (or press F9) to bring the Action window in evidence.
Now the fun begins.
The Code
OK. You see the running example in this page and are wondering: "how will we manage hundreds of different snowflakes?"
Well, thanks to objects it will be quite simple: we just need to instruct an object how to behave and it will manage itself pretty well.
Let's think a little bit about what each snowflake needs to do. In every frame it must recalculate its new position and withdraw itself when it goes off-scene.
Examining the object tree we discover that the object MovieClip has an event named onEnterFrame which is executed every time that the frame is about to be displayed on stage.
So, all we have to do is code the onEnterFrame event and everything will be just fine.
Here is an skeleton of what we have thought so far.
/* onEnterFrame
** Runs every time the frame is "played"
*/
clipSnow.onEnterFrame = function()
{
// Update the snow position
this._y += this.speed;
// If the snowflake is off-stage remove itself
if (this._y > stageHeight)
{
this.removeMovieClip();
}
};
Very well, but how do we create the flakes anyway?
Once more by examining the MovieClip object we discover that it has a method named called attachMovie that links a movie clip from the library to the current timeline . Like this:
var clipSnow:MovieClip = this.attachMovie("flake1_mc",
"flake_UNIQUE_ID_mc",
_global.cDepth);
After creating the movie clip in the main timeline, the rest is pretty much straightforward. Just take a look at the complete code.
/* randRange
** Returns a random number between minNumber and maxNumber
*/
function randRange(minNum:Number, maxNum:Number):Number
{
return (Math.floor(Math.random()*(maxNum-minNum+1))+minNum);
}
/* Defines the Width and Height of the movie
*/
var stageWidth:Number = 800;
var stageHeight:Number = 850;
/* Creates a Depth information
** in the global object
*/
_global.cDepth = 100;
/* onEnterFrame
** Runs every time the frame is "played"
*/
this.onEnterFrame = function ()
{
if (randRange(0, 5) == 0)
{
// Creates a new Snow Flake
var randSnow:Number = randRange(1, 10);
var clipSnow:MovieClip = this.attachMovie(
"flake" + randSnow + "_mc",
"flake" + _global.cDepth + "_mc",
_global.cDepth);
_global.cDepth++;
// Position the snow flake
clipSnow._x = randRange(0, stageWidth);
clipSnow._y = -50;
// Scale the snow
var scale:Number = randRange(30, 50);
clipSnow._xscale = scale;
clipSnow._yscale = scale;
// define the snow speed
clipSnow.speed = randRange(2, 5);
// define some variables to calculate the position
clipSnow.angle = 0;
clipSnow.originalX = clipSnow._x;
// Create a function that updates the snow position
clipSnow.onEnterFrame = function()
{
// Update the snow position
this._x = this.originalX + (this.width * 5 *
this.scale *
Math.sin(this.angle));
this._y += this.speed;
this._rotation = this.angle;
this.angle += 1;
// remove the clip if it's no longer show
if (this._y > stageHeight)
{
this.removeMovieClip();
}
};
}
};You may notice that this code does a little bit more than just dropping the snow vertically. It also makes the snowflake dance a little to the sides in a sinuous way, and it also rotates the flake for a nice effect. If we hadn't set the registration mark to the center of the movie clip the rotation would be awkward.
With a little more experimentation this code could easily duplicate the Matrix effect.
Obs.: The type identifier :Number works only with ActionScript version 2.0, so make sure that the publishing configuration is correctly set.
Last Update: mai.05.2009
Original Publishing Date: dez.17.2005
Copyright © 2005-2009 : Paulo Santos.